Left:
U.T. ROBERT'S SCRAM
Ā
Contents:
Contact info:
- Jim Michalak
- 118 E Randall, Lebanon, IL 62254
- Ā
- Send $1 for info on 20 boats.
Ā
Ā
Jim Michalak's Boat Designs
118 E Randall, Lebanon, IL 62254
A page of boat designs and essays.
(15OCT98) This issue will start a discussion about laying out a pattern for making a lugsail from ordinary polytarp. Next issue (about 1Nov) will continue the sail making essay with details about cutting and sewing the sail.
I'VE HAD TROUBLE here at the old shack. A couple of weeks ago the old 386 confuser started acting up, refusing to boot, email disappearing, and general difficulties. I thought a virus came through the email. The internet guru says no and thinks a bit of my old hard drive went off. Anyway, the solution is supposed to be to reformat the drive, or put in a new drive, and reinstall everything. I won't be doing that right away as I've patched things up enough to continue on for the time being. But if I miss an issue or two soon you will know why. More important, I've lost most of my email. Some of you have written and your letters disappeared before I could answer them. Try again.
|
Ā
Left: U.T. ROBERT'S SCRAM Ā |
|
|
Ā
|
|
Ā |
Ā
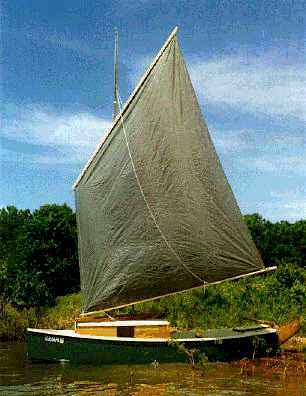
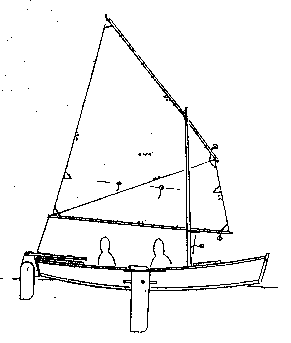
The photo up by the table of contents shows UT Roberts' Scram Pram with a balanced lug sail I sewed for him last year. (I sew up similar sails for about $2.50 a square foot using white Dacron sailcloth if anyone is interested.) But it would have been possible to sew up a similar sail in ordinary polytarp for perhaps $30 or $40 in materials. There are limits I am sure to using polytarp for sails although I feel that we are still learning them. I've got some polysails that are about 5 years old and still quite good although they have been stored indoors. For a polysail that sees regular use, some of it hard, it seems that maybe three years is a reasonable life span. I know of two that reached their end in about that time span. One flaked apart as polytarp will do. The other stretched out and lost its shape. It was recut and is now back in use. As to how large and heavy a boat is possible with polytarp sails, I don't know yet.
But I can say with confidence that polytarp works well with an ordinary day sailer of up to 500 pounds max.
A LITTLE HISTORY...
I made my first poly lugsail about 5 years ago. Until then I had used sails of real sailcloth sewing them with vertical panels according to pattern instructions in MAKE YOU OWN SAILS by Bowker and Budd. The sail on UT's Scram is sewn that way. The first poly lugsail I made was a straight copy of the Bowker and Budd method. I cut the large one piece polytarp into 3' wide strips to simulate regular sailcloth and sewed it all back together using standard broadseams. (A broadseam is a seam of varying width which produces a draft "pocket" in a sail made from flat material.) For the next polysail I left the tarp in one piece, marked where the broadseams would normally be, slit the tarp at those locations, taped in an overlap of the slit pieces equivalent to the broadseam and sewed it all up with doublers over the slits. In my catalog of prototypes is an essay, originally written for Messing About In Boats, that describes the method. At the same time we were learning how to strenghten the poly sail in the corners and perimeter to better take the loads of on the sail. Then Robert Smith's wife sewed up the polysail for his Cubit using the standard dressmaker's dart in lieu of the slit and doubled broadseams that I had been using. Much simpler and strong enough.
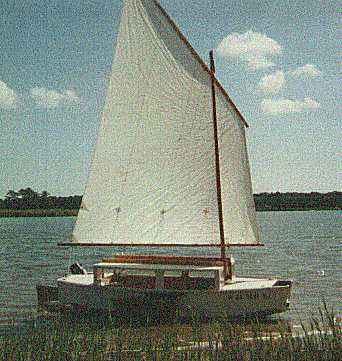
Three years ago I rethough making a lugsail from large polytarps, a way which really doesn't apply to real sailcloth. The picture shown above is of my Jinni in its last days. The sail is a 114 square foot lug made from a single poly panel and shaped with just two darts. There was really no trial and error involved with the new method because there is a way to size and shape the panel and darts before getting started.
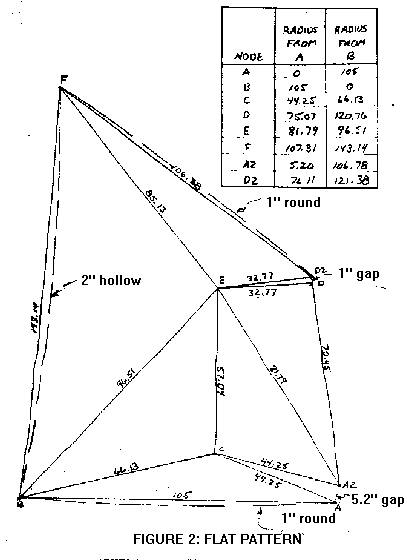
Look down at Figure 1 to get the basics of how it was done. Figures 1 and 2 are actually the details that I used to make a 70 square foot sail for my Piccup Pram, not the Jinni sail.
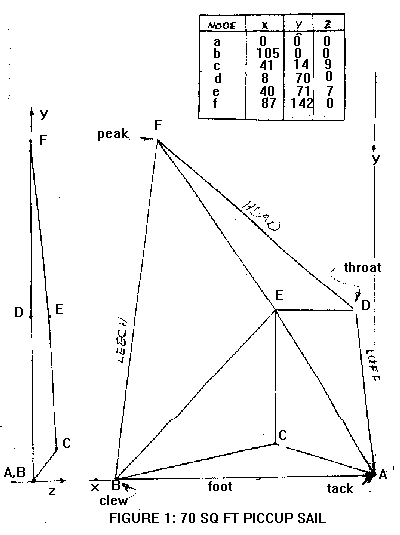
What we have here is a three view drawing of a lugsail in xyz cooridinates. As you look at Figure 1 remember that points C and E stick out of the page enough to give the sail roughly a 10 % draft. That is to say if the sail were 100" long from luff to leach, it would bow out in an airfoil shape about 10". So in a way the sail shape shown would approximate a double wedge airfoil. It is a three dimensional figure.
The idea is to imagine a shape that can be approximated by a bunch of triangles. Then imagine cutting along the edges of certain triangles such that the three dimensional pattern can be pressed flat. Then if you could reconstruct that cut pattern on a full sized piece of material and sew the cuts back together, you would have the three D figure again in full size.
In order to establish the cut pattern, which is shown down in Figure 2, you need to define true flat pattern shapes of all those triangles. It's actually pretty easy to do. You need to calculate the true lengths of all the lines in Figure 1. Take the easiest one first, line AB. A is drawn more or less as the origin of the plan at point x=0, y=0. B is at point x=105, y=0. So the distance between the two is 105". Next take line AC. C is at point x=41, y=14, z=9. To caluculate the length of line AC you need to use the Pythogorean theorem that the sum of the squares of the sides of a right triangle is equal to the square of the length of the hypotenuse. So for line AC, the length of the x side is 41, the length of the y side is 14 and the length of the z side is 9. 41 squared is 1681. 14 squared is 196. 9 squared is 81. Those squares add up to 1776. The square root of 1776 is 42.14 and that is the true length of line AC. You can program your computer to do this sort of work with any spreadsheet program but. to tell you the truth, a scientific hand calculator and pencil and paper are about as fast. You make out a table of the true lengths of all the lines in Figure 1.
NOW YOU CAN LAY OUT THE TRUE FULL SIZED PATTERN.....
Look again at Figure 2. You need to find a way to slit the 3D sail pattern along certain lines that will allow it to press flat. In the example I have slit it along AC and DE. I think it also could have been slit along BC and FE, or AC and FE, or BC and DE. But you see the effect.
To lay out the pattern full sized on a sheet of polytarp, first unfold the polytarp and spread it out as flat as possible. That may not be easy. Stretch it and weigh it down. One problem with polytarp is that it is usually difficult to impossible to get it to lay truely flat without creases. The flatter you get it the better. The general idea is to lay out the pattern in such a way that no edge line comes within say 4" of the edge of the tarp. That way you will have some material along the edge lines to allow for spar bending and for sewing hems.
For this Piccup sail, I would start by laying out line AB. I use a steel measuring tape with its end at point A secured by a weight and stretched to B. Point B is marked well using a waterproof felt tip marker. Then I stretch a chalk line from A to B and snap a straight line. Next I use two steel tapes, one swung from point A and the other from point B to establish point C on the polytarp. The lengths used on the tapes while establishing point C are the true lengths AC and BC that were previously calculated. To get it right the measuring must be done with good accuracy. Then point C is marked with the felt tipped marker and lines AC and BC are snapped with the chalk line.
So we have established the true shape of triangle ABC on the tarp. We repeat the process to establish all the triangles in full size true shape. For example the next triangle would be BCE using BC of the first triangle as a starting point. When done we will have all the points of Figure 2 marked in felt tip pen and all the straight lines marked in chalk.
Next we mark the lines that will make up the real edges of the sail. Here we will adjust the straight lines for extra round required for spar bending and in the case of the leach, some hollow to prevent fluttering. I'm quite certain the luff is best left straight. So to mark these you will need a flexible battern long enough to span the points in question. For the leach you would anchor the batten at points B and F, push the batten center inward about 2" and mark with a felt pen. The rounds required for spar bending might vary quite a bit. You might seek guidance from the essay on that subject in a previous issue of this page. For the Piccup I guessed the spars would flex outward about an inch in normal service. So for the head of the sail, for example, the batten is anchored at points F and D2, pushed outward an inch, and marked with the felt tip marker.
The lines AC and DE have been opened up, of course. So they now look like "V's" instead of a straight line. So I've shown two points as A2 and D2 to define the openings. There are shown at those points "gaps" of 5.2" and 1". But don't cut the pattern at those gaps. Instead cut straight across from A to A2 and from D to D2. We will close those gaps while sewing up the sail with a traditional sewing "dart" as opposed to cutting them along the edges and rejoining them somehow.
If you followed the previous essay on sail cloth you might ask "Where is the round for the sail draft?" Good question. I've only shown round for the bending of the spars. The answer is that the pattern shown in Figure 2 has by nature extra material in it to allow for the "draft round" of traditional sail making. When the "gaps" are sewn shut you see that the pattern actually has the extra draft round material sewn in.
On the Piccup pattern shown in Figure 2 I carried the pattern a few steps beyond what I have described above. By using the true lengths of the triangles I was able to define all the points in XY coordinates with my computer, in short I was able to do the flat pattern lay out on paper. But there would have been no accurate way to lay out the pattern that way on the polytarp. So I took it another step and redefined the location of the flat pattern points as radii swung off points A and B. And those radii are shown in the table in the upper right of Figure 2. The idea was to stretch out the tarp, establish line AB, pivot one steel tape at point A and another at point B and then draw all the points by swinging the radii shown from just those two points. And laying out the sail took but a few minutes. Alas, figuring out the inersection points and radii took forever.
A COUPLE OF EXTRA THOUGHTS....
Getting the size of the "gaps" at points A and D is critical, I think. More so than any other dimension. If I were just making the sail taller or shorter, I would think the gap dimensions would stay the same on the new pattern. But if I were making the sail wider with no change in the draft percentage of the sail, I would think the gap dimension would increase in direct proportion to the width dimension. Clearly if the new sail were a a straight scale up or down of this one, the pattern including the gaps would be also be a straight scaling.
I've never tried making a triangular poly sail although others have done so. What is interesting about the method shown above is that it appears that an effective way of shaping a triangular sail made of one sheet poly would be with a single seam from the tack, more or less the equal of seam AC on the above sail.
NEXT TIME...
I'll show the details of sewing up a poly lug sail.
MAYFLY
MULTI PURPOSE SKIFF, 14' X 4' X 200 POUNDS EMPTY
Someday I may get to put my full catalog on the net. For now I'll put one design in each issue.
MAYFLY
Mayfly is a simple all around skiff for rowing and sailing. A boat like this would be an excellent candidate for a sail made of polytarp, a $40 sail on a $200 hull instead of a $400 sail on a $200 hull. She's made with nail and glue construction and you might try waterproof construction adhesive that comes in tubes in lieu of boat glue. You will still need to armor the chine corners with glass cloth or tape set in epoxy but a quart of epoxy will suffice and you will have to deal with that sticky stuff only once. Here are the Mayfly words in the current catalog of prototypes:
Mayfly is a simple skiff of traditional flat-iron looks and construction. She is 13-1/2 feet long, 4 feet wide, and will probably weigh about 200 pounds complete. She will be happiest living on a small trailer.
Mayfly has the same layout I've used on all my skiffs wih a sleeping sized cockpit sandwiched between bow and stern chambers which provide storage and emergency buoyancy. Her cockpit will hold two men and she has sufficieint displacement to float them easily.
I stole her 74 square foot lugsail rig from the Woobo skiff. Her leeboard and rudder pivot for sailing in shallows. The balanced lug rig will stow in the boat and is both docile and powerful. It is built of wood, rope, and cloth and you can make the whole thing yourself. A pattern for sewing your own sail is on the plans.
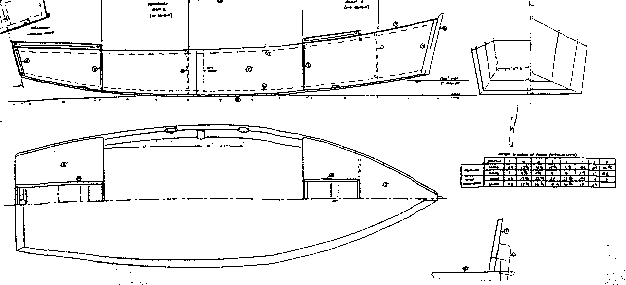
Mayfly's construction calls for 3 sheets of 1/4" plywood with 2 sheets of 1/2" plywood for the bottom. No building jig or lofting is required. You cut the sides to diagrammed shapes, bend them around the bulkheads, attach the bottom and then the decks.
Plans for Mayfly are $15 until one is built and tested.
Prototype News
Some of you may know that in addition to the one buck catalog which now contains 20 "done" boats, I offer another catalog of 20 unbuilt prototypes. The buck catalog has on its last page a list and brief description of the boats currently in the Catalog of Prototypes. That catalog also contains some articles that I wrote for Messing About In Boats and Boatbuilder magazines. The Catalog of Prototypes costs $3. The both together amount to 50 pages for $4, an offer you may have seen in Woodenboat ads. (If you order a catalog from an internet page you might state that in your letter so I can get an idea of how effective this medium is.) Payment must be in US funds. The banks here won't accept anything else. (I've got a little stash of foreign currancy that I can admire but not spend.) I'm way too small for credit cards.
Usually when a design from the Catalog of Prototypes starts getting built I pull it and replace it with another prototype. So that boat goes into limbo until the builder finishes and sends a test report and a photo.
Here are the prototypes abuilding that I know of:
Sportdory: Word from Dave Burdecki in California was that he had his completed but no word of the launching. You can check out John Bell's Sportdory progress by clicking here .
IMB: Click here to visit Tim Webber's page and see some photos of the Texas IMB under construction. Then poke around Tim's web page a bit. I heard this week from the Texas IMB builder who said,"I want to let you know that IMB is alive and looking good. She is now right side up and sitting on her cradle. Soon this boat and carrier will be mounted on the small trailer I have ready......"
Fatcat2: There is an old timer (80 years +) in Minnesota who has completed the hull of a Fatcat2. Fatcat2 is a simple 15' x 6' catboat, gaff rigged and multichined. I think the sail rig will be done this coming winter.
QT Skiff: This one has been popular in the catalog of prototypes for a long time but none were confirmed built. Now a builder in New York has finished one in a week or two. Awaiting a photo and a test report.
Shantyboats (archived copy)
Herb builds AF3 (archived copy)
Hullforms Download (archived copy)